
- Today
- Total
| 일 | 월 | 화 | 수 | 목 | 금 | 토 |
|---|---|---|---|---|---|---|
| 1 | 2 | 3 | 4 | |||
| 5 | 6 | 7 | 8 | 9 | 10 | 11 |
| 12 | 13 | 14 | 15 | 16 | 17 | 18 |
| 19 | 20 | 21 | 22 | 23 | 24 | 25 |
| 26 | 27 | 28 | 29 | 30 | 31 |
- sigmoid
- r
- rest api
- ios
- MVC
- deeplearning
- 명령어
- rxswift
- tapply
- SWIFT
- Python
- Observable
- 오블완
- decode
- HTTP
- substr
- SQL
- cocoapods
- ReLU
- Linux
- scheduledTimer
- 연산자
- 티스토리챌린지
- Request
- swiftUI
- 딥러닝
- barplot
- struct
- Optional
- 시각화
iOS 개발 기록 블로그
iOS(Swift) Progress Bar 사용법 본문
Progress Bar는 아래 링크에 달걀 삶는 프로젝트에서
시간이 시각적으로 얼마나 남았는지 보여줄 수 있는 UI 요소 중에 하나이다.
https://crazydeer.tistory.com/entry/iOSSwift-Timer-Code-타이머-코드-개요-이슈-해결-추가
iOS(Swift) Timer Code (타이머 코드 개요, 이슈, 해결, 추가)
Swift에서 타이머를 생성하는 방법이다. 우선 다들 이러한 기능이 필요하면 하는 거 있잖아요. 구글링 합니다. 바로 위에 들어가면 코드가 딱 나온다. 그거 들어가서 아래로 내리면서 가장 투표
crazydeer.tistory.com
생성 방법
우선 Main.storyboard에서 우상단에 + 버튼을 클릭하여
Progress View를 드래그 앤 드롭하여 생성해준다.
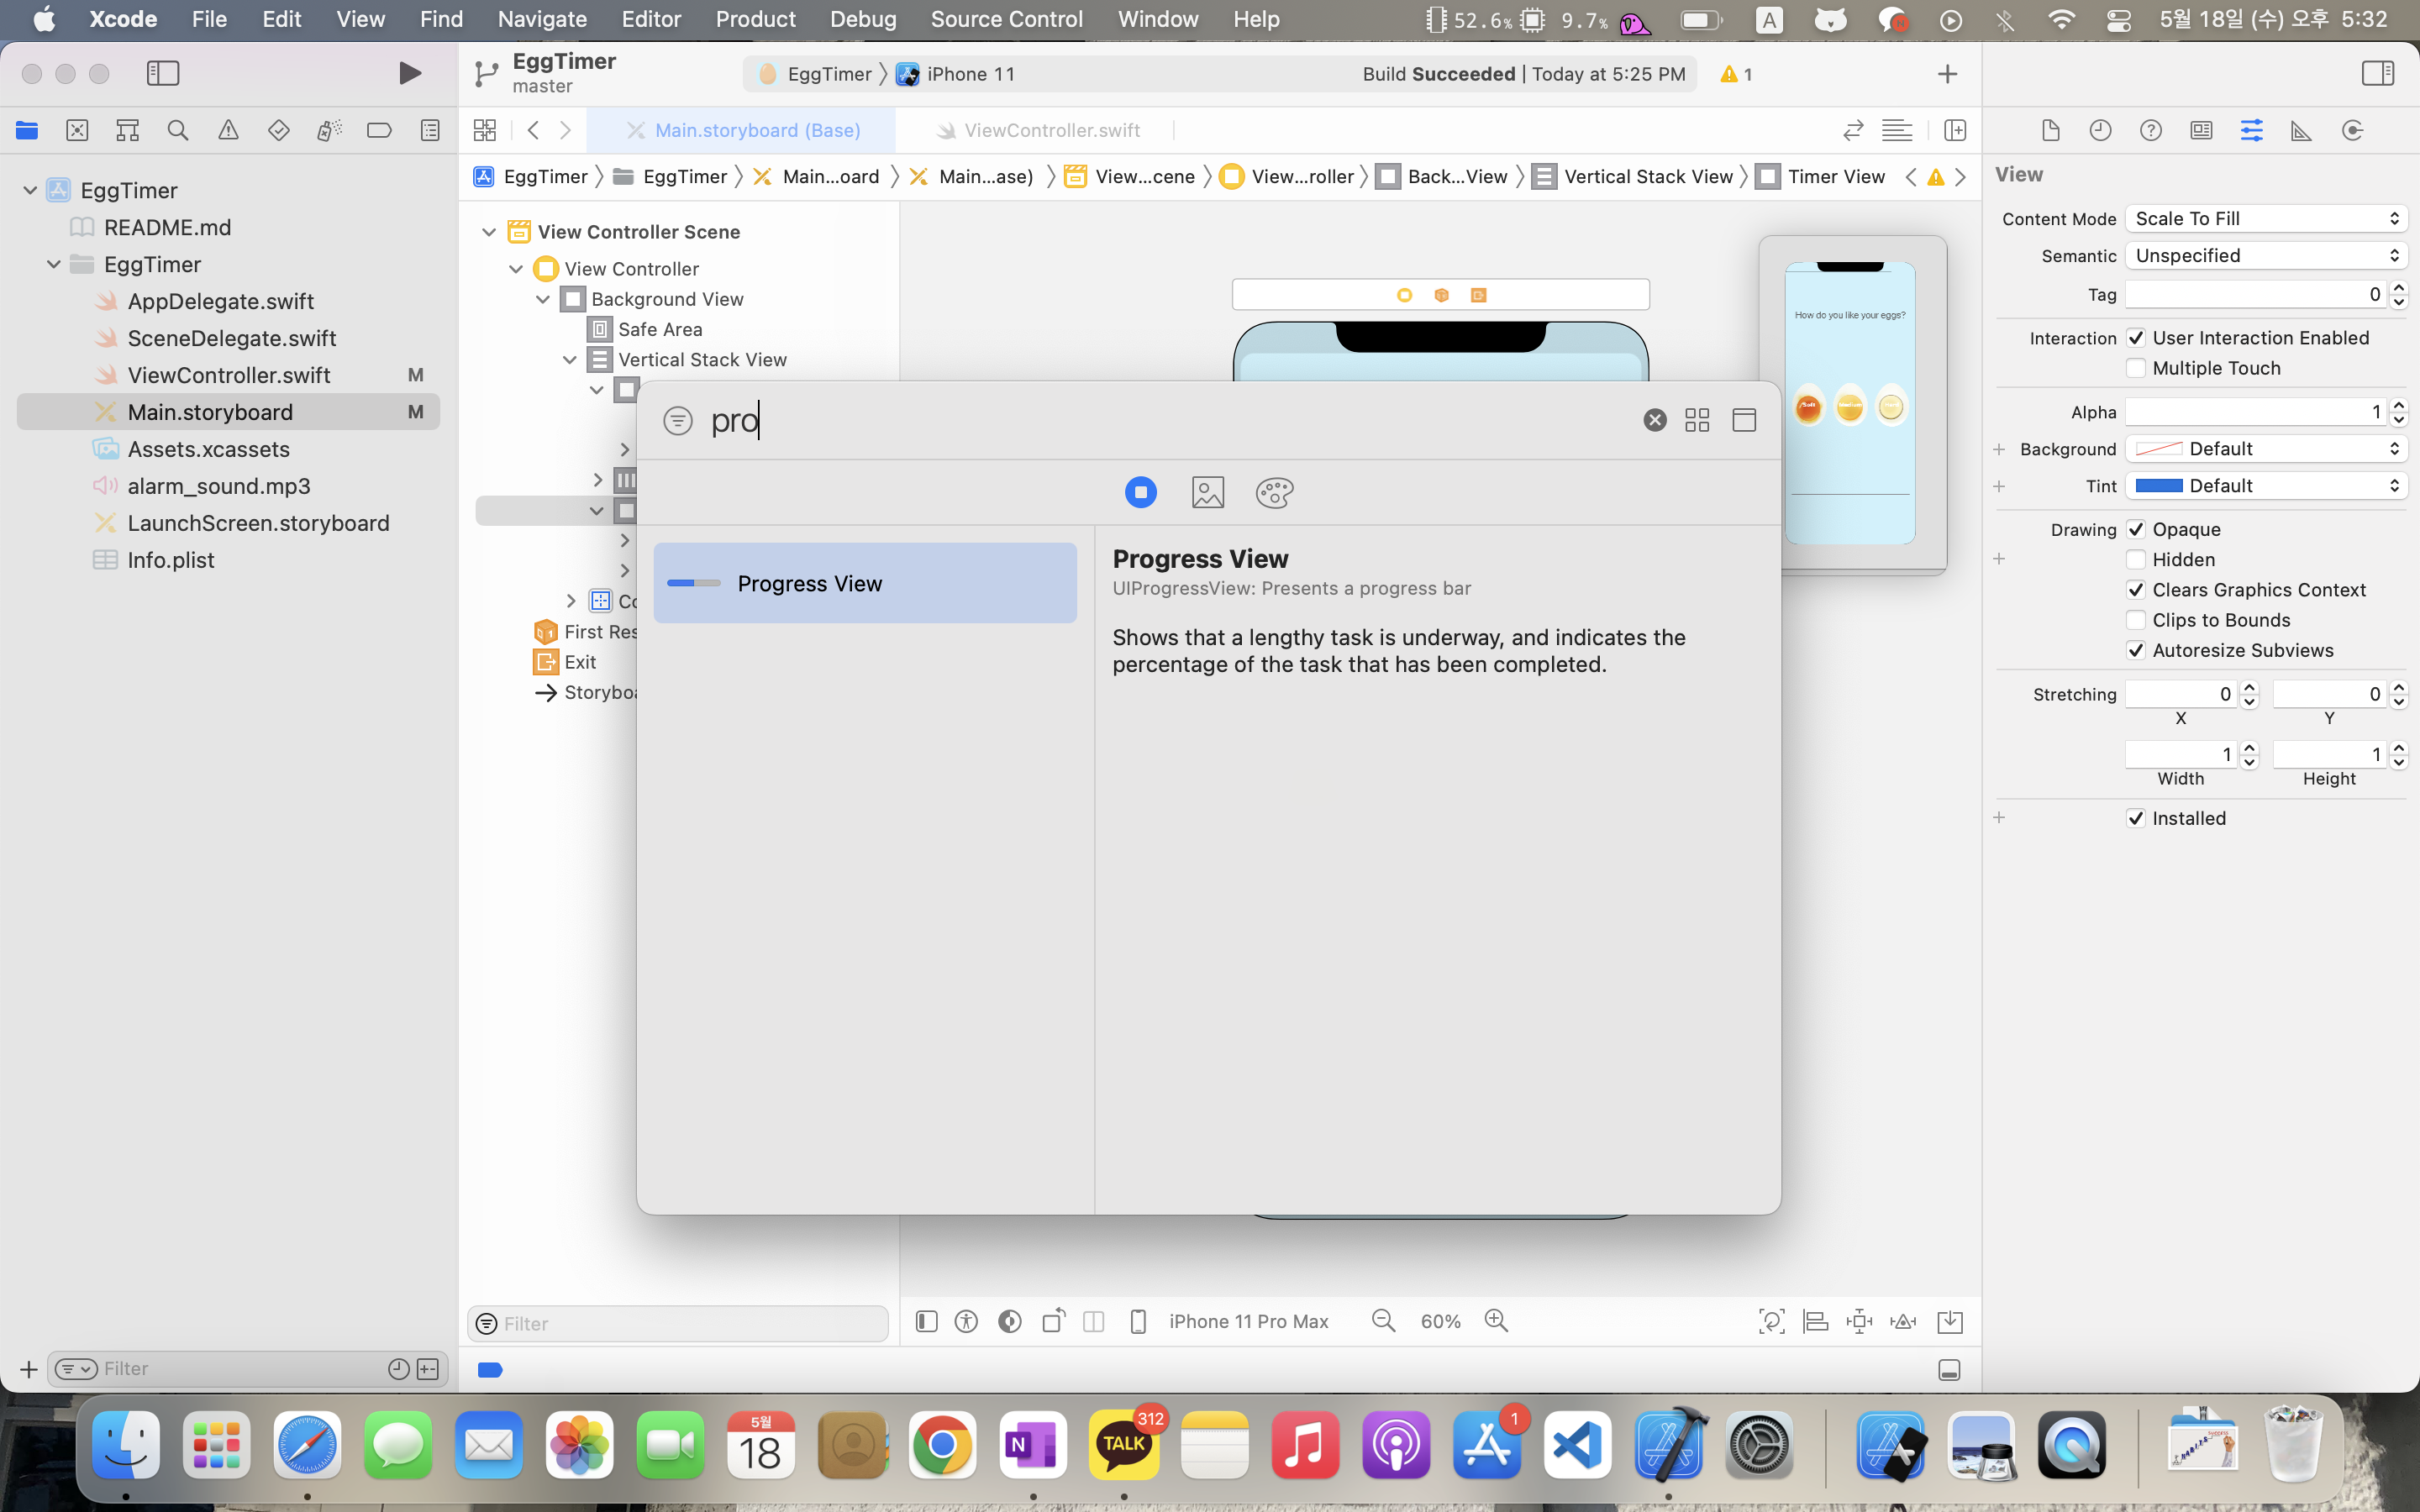
사용법
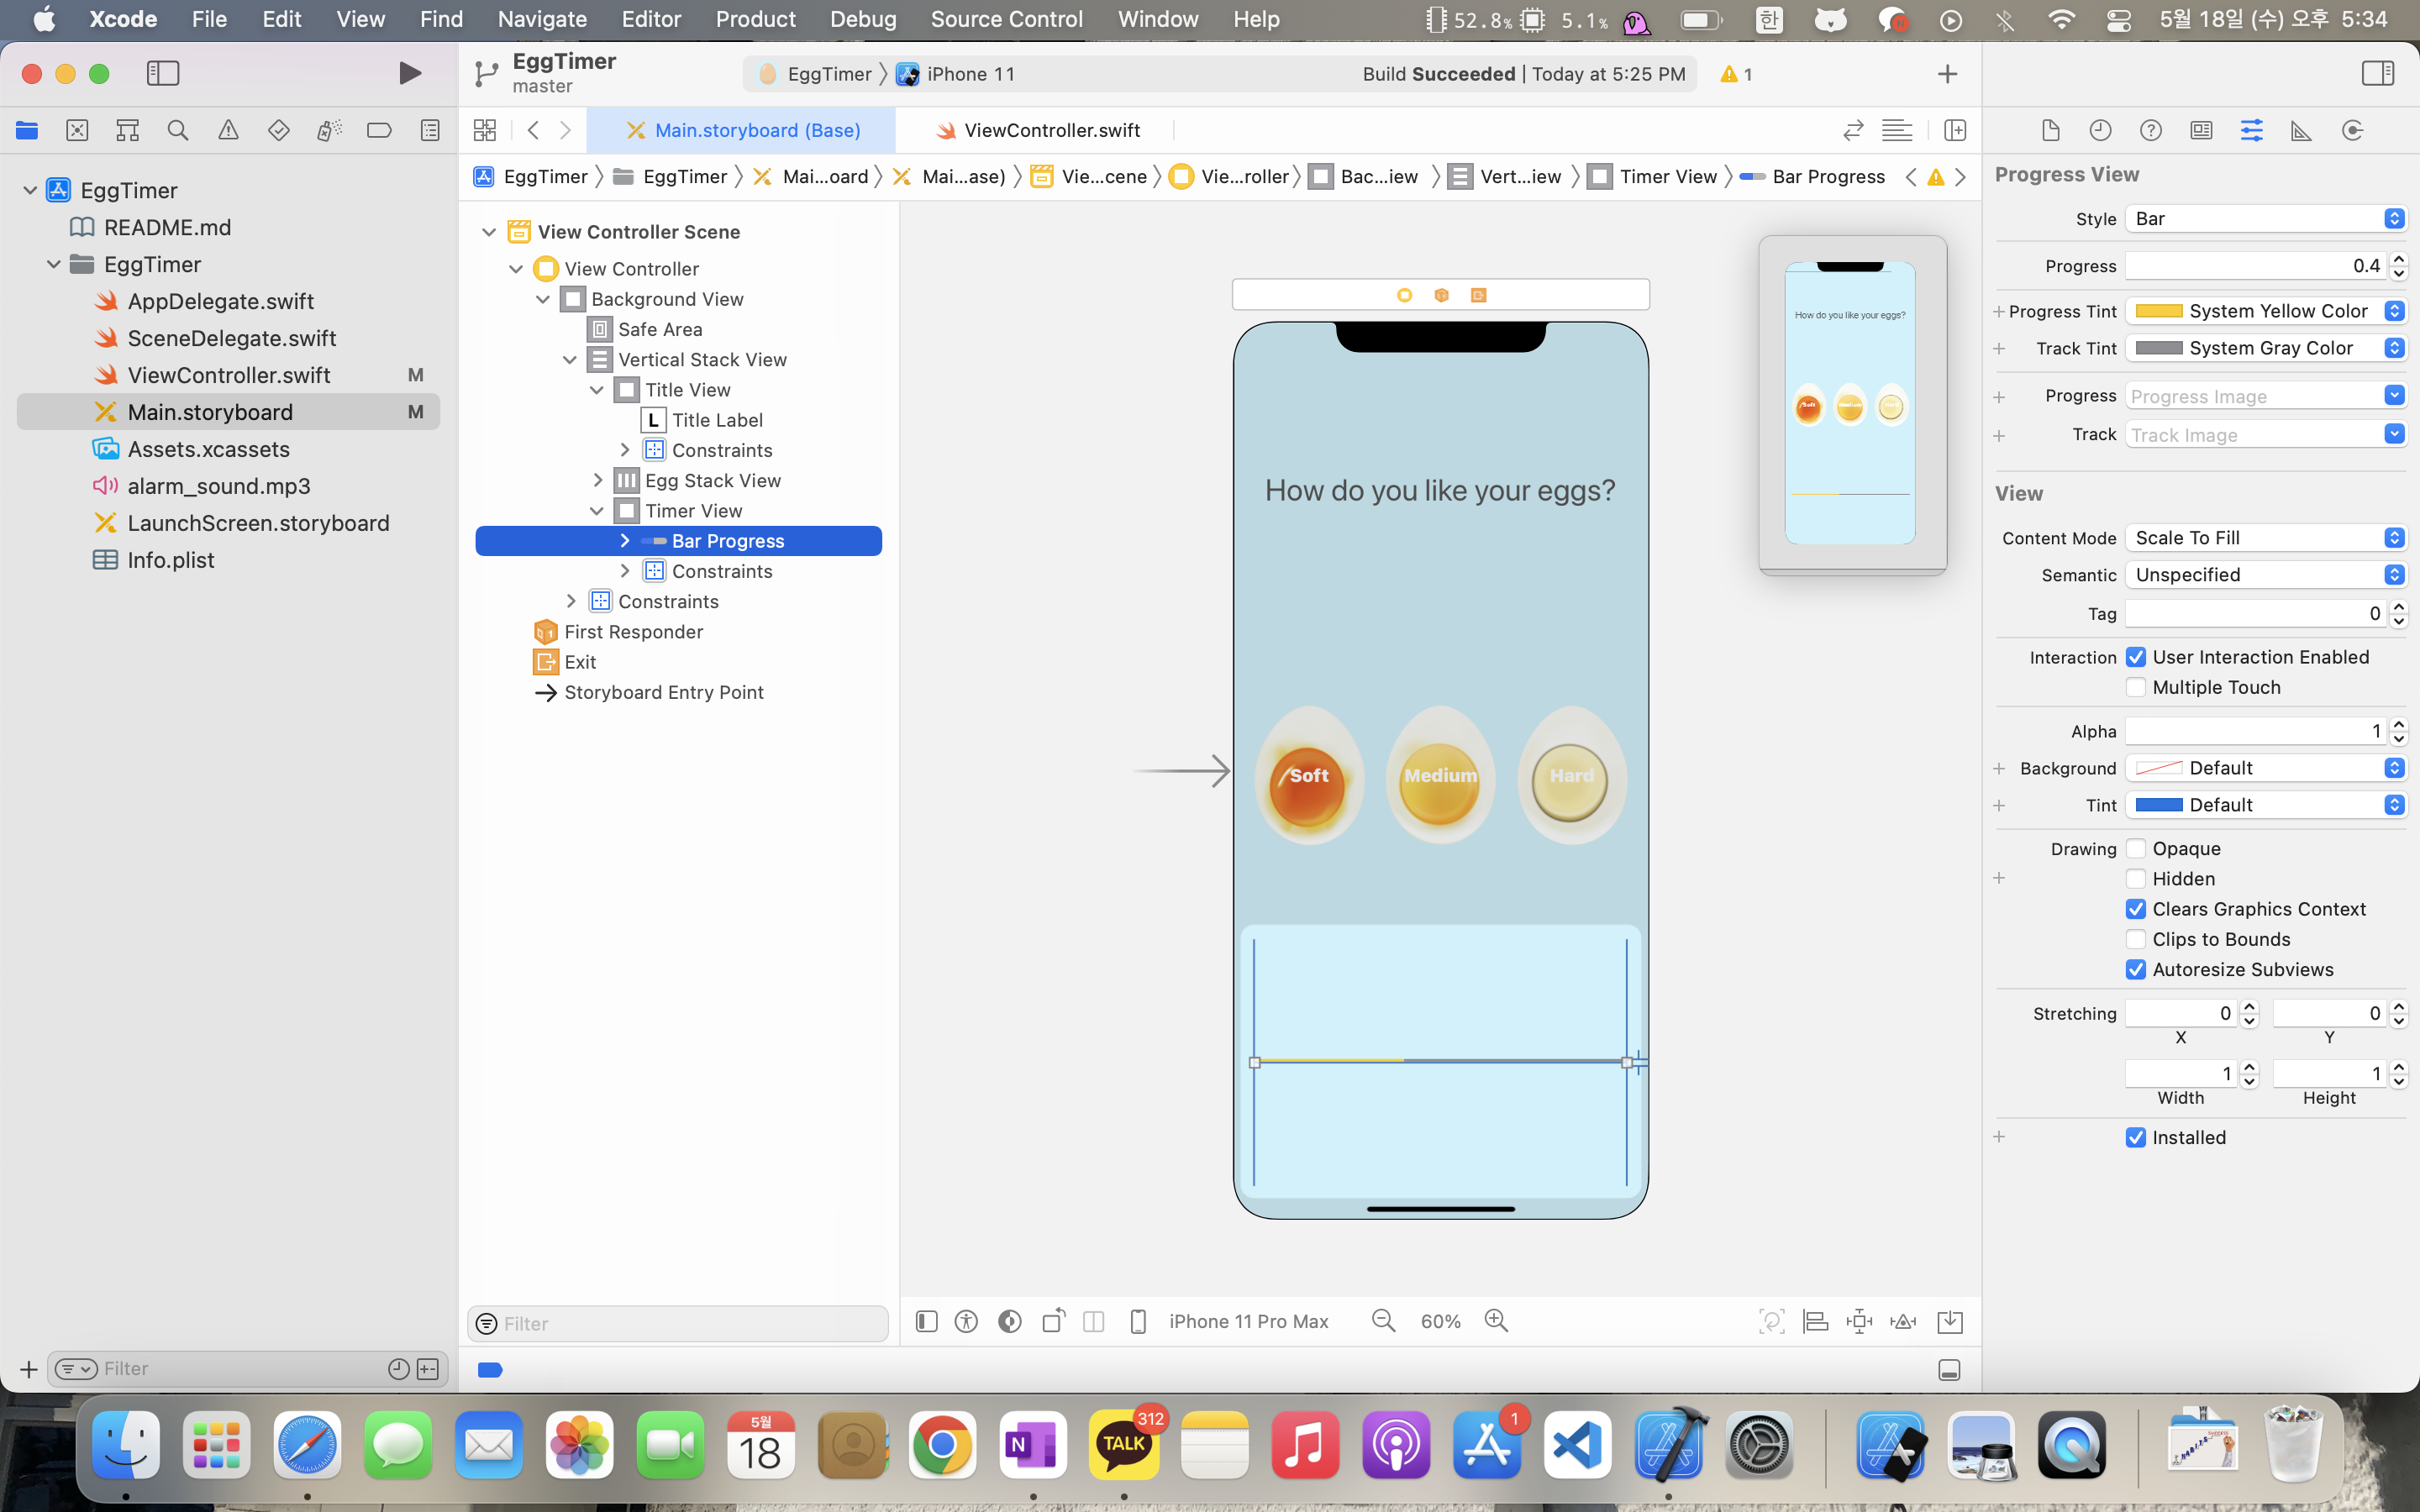
그리고 우측에 inspector창을 보면 Progress라는 프로퍼티가 보일 것이다. (아래 이미지 참고)
그게 막대가 얼마나 찬지 비율을 말한다.
0.0부터 1.0까지의 Float형 데이터로 퍼센트라고 보면 된다.
예를 들어 0.35면 막대가 35% 차게 된다.
그 아래 Progress Tint와 Track Tint로 색상을 바꿀 수 있다.
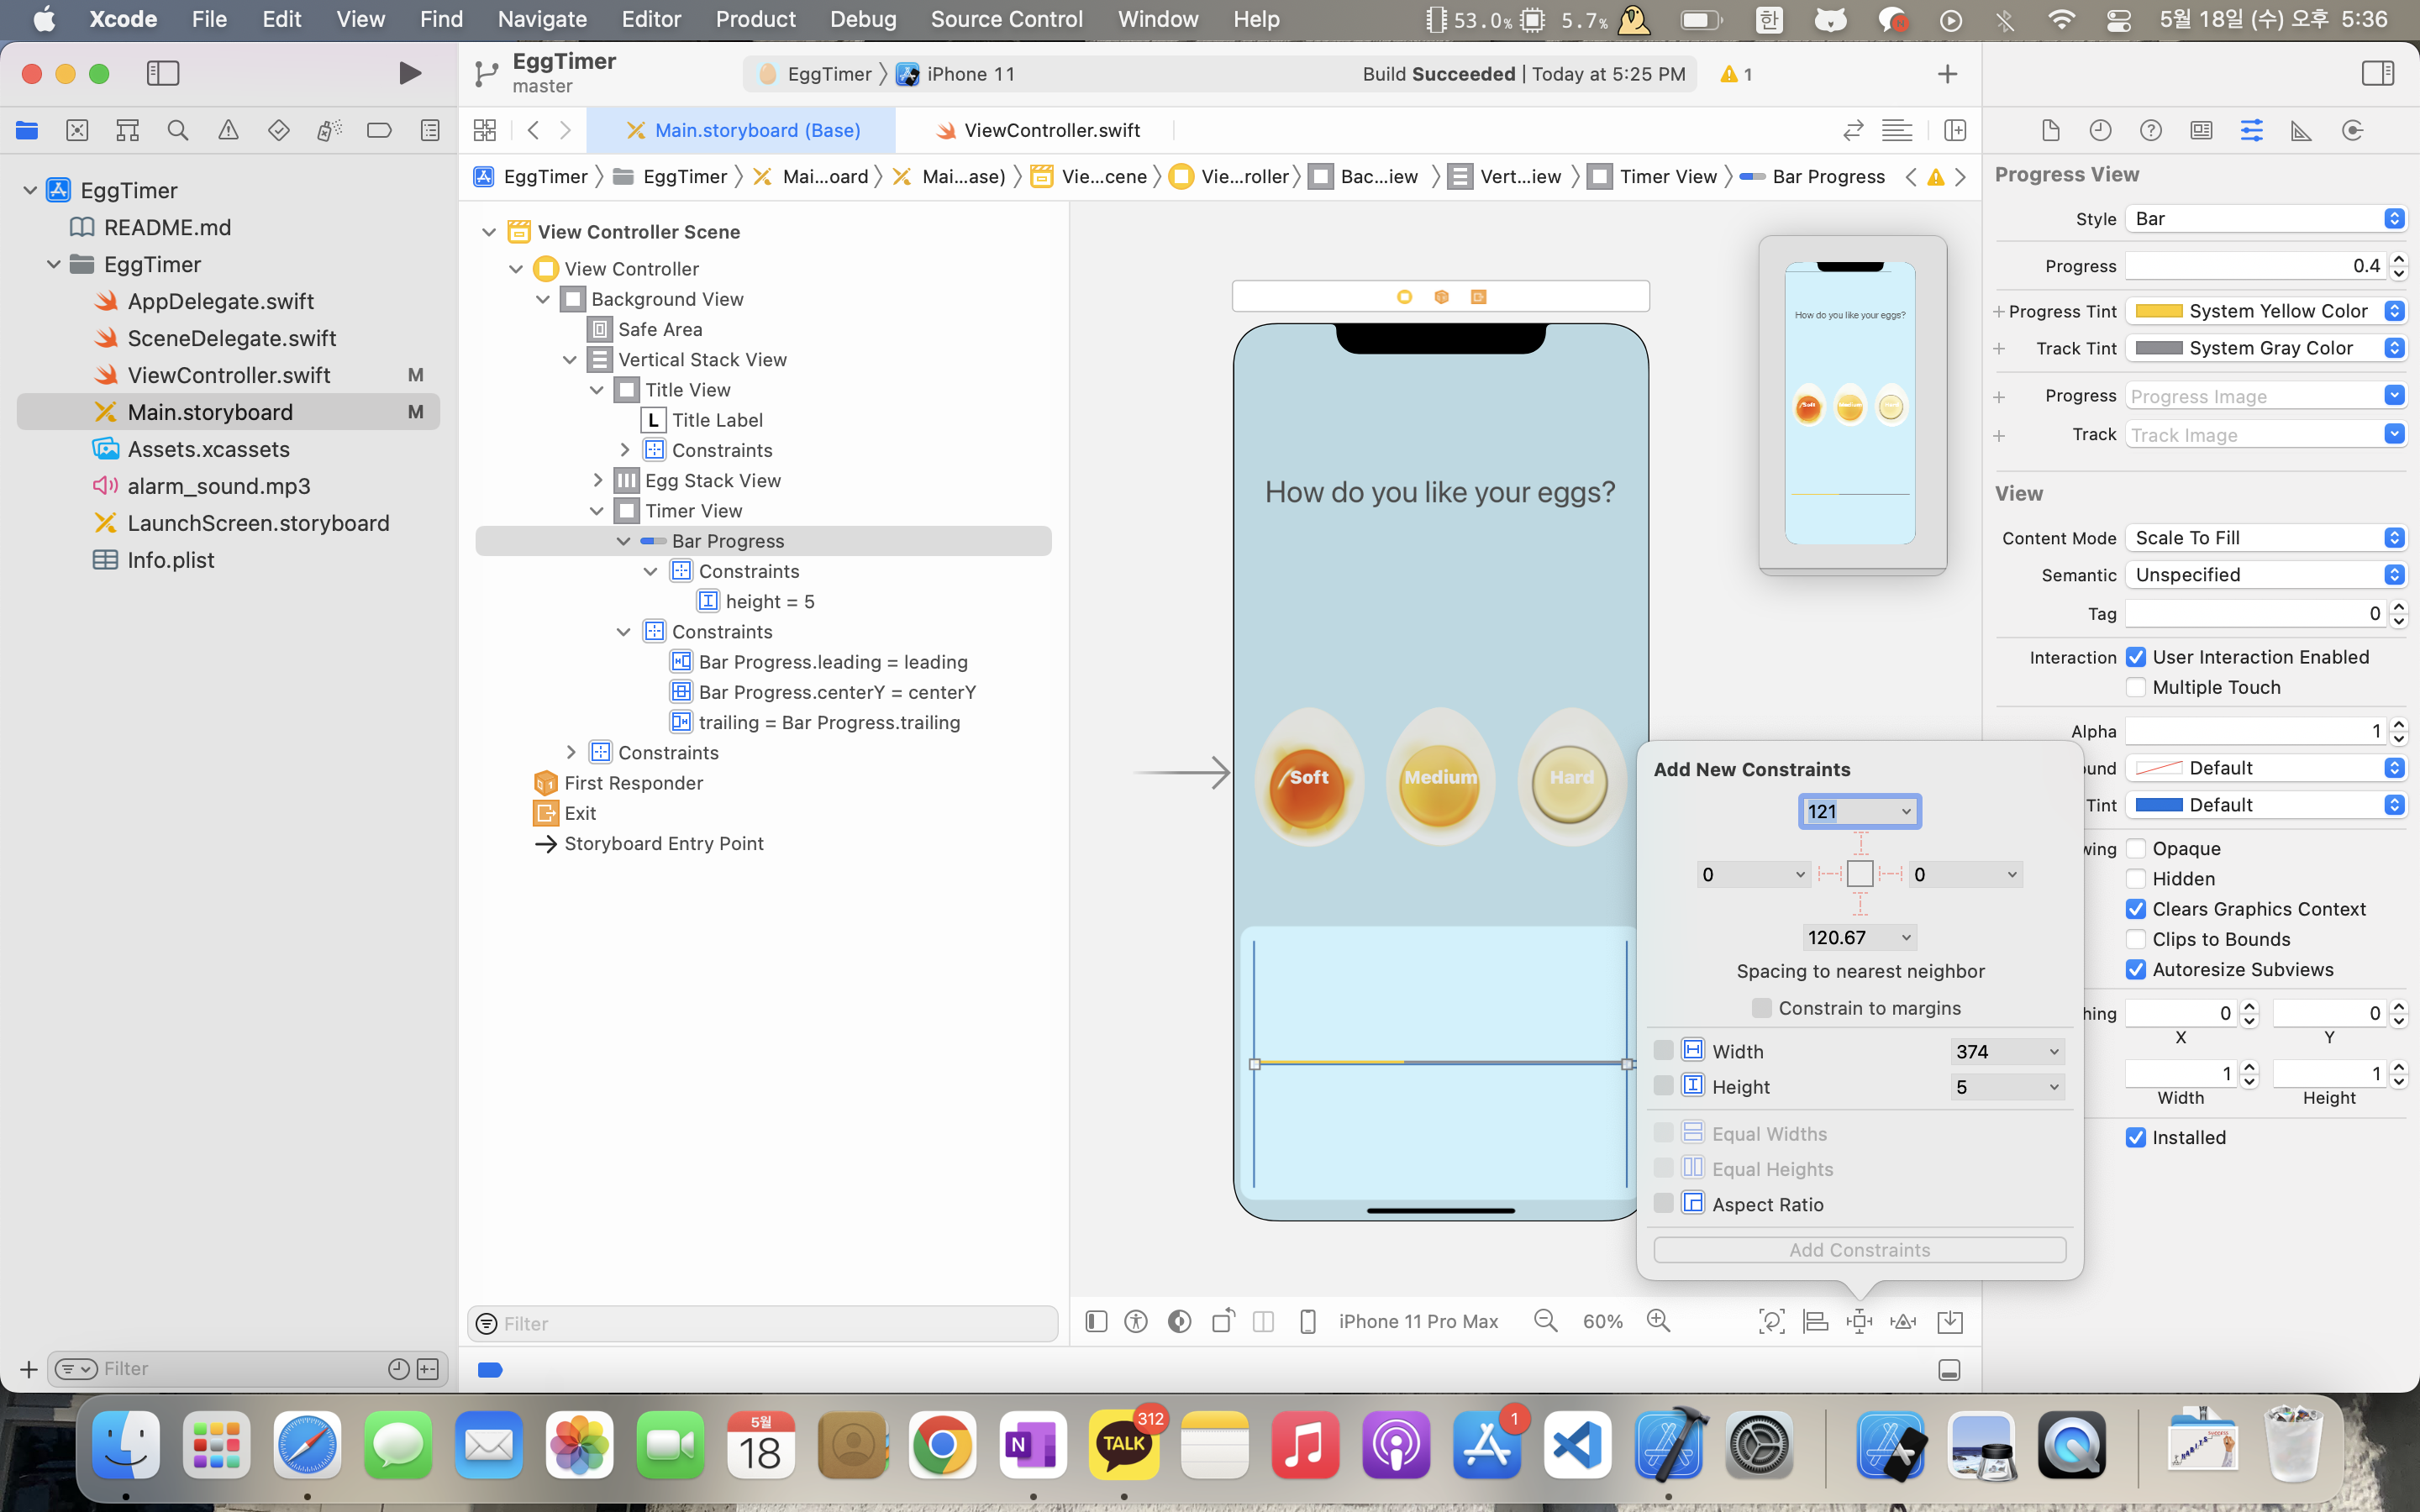
Auto Layout
Constraints는 좌우를 각각 0으로 줘서 좌우로 길게 늘어트린다.
Vertically in Container를 줘서 중앙을 맞추고
Bar Progress의 Height Constraints를 5로 줘서
막대기의 굵기를 설정한다.
코드
| importUIKit importAVFoundation class ViewController: UIViewController { @IBOutlet weak var titleLabel: UILabel! @IBOutlet weak var barProgress: UIProgressView! leteggTime= ["Soft": 5, "Medium": 7, "Hard": 12] vartimer= Timer() var totalTime = 0 var secondsPassed = 0 var player: AVAudioPlayer? @IBActionfunchardnessSelected(_sender: UIButton) { timer.invalidate() // when you clicked button, stop timer and cancel it player?.stop() lethardness = sender.currentTitle! totalTime= eggTime[hardness]! barProgress.progress= 0.0 secondsPassed = 0 titleLabel.text= hardness timer = Timer.scheduledTimer(timeInterval: 1.0, target: self, selector: #selector(updateCounter), userInfo: nil, repeats: true) } @objc func updateCounter() { if secondsPassed < totalTime { secondsPassed+= 1 barProgress.progress = Float(secondsPassed) / Float(totalTime) } else{ timer.invalidate() // when the timer has done, remove it barProgress.progress= 0.0 titleLabel.text= "Done!" playSound() } } func playSound() { guardleturl = Bundle.main.url(forResource: "alarm_sound", withExtension:"mp3") else{ return} do{ tryAVAudioSession.sharedInstance().setCategory(.playback, mode: .default) try AVAudioSession.sharedInstance().setActive(true) /* The following line is required for the player to work on iOS 11. Change the file type accordingly*/ player = try AVAudioPlayer(contentsOf: url, fileTypeHint: AVFileType.mp3.rawValue) /* iOS 10 and earlier require the following line: player = try AVAudioPlayer(contentsOf: url, fileTypeHint: AVFileTypeMPEGLayer3) */ guardletplayer = playerelse{ return} player.play() } catchleterror{ print(error.localizedDescription) } } } |
코드는 위와 같다.
Progress Bar를 연결해주고 (Control + 드래그 앤 드롭)
총 걸리는 시간을 totalTime, 지나간 시간을 secondsPassed로 해주고
위와 같은 방식으로 현재까지의 진행 상황을 비율로 구한다.
barProgress.progress = Float(secondsPassed) / Float(totalTime)
여기서 주의할 점이 있다.
Int형 데이터를 나누면 소수점이 날아간다.
예를 들어 5를 2로 나누면 2.5가 아닌 2가 나온다.
따라서 나누고 Float형 변환이 아닌 Float형 변환 후 나눠야 한다.
하단부에 playSound() 함수는 구글에서 그대로 검색해서 갖다 쓴 것이다.
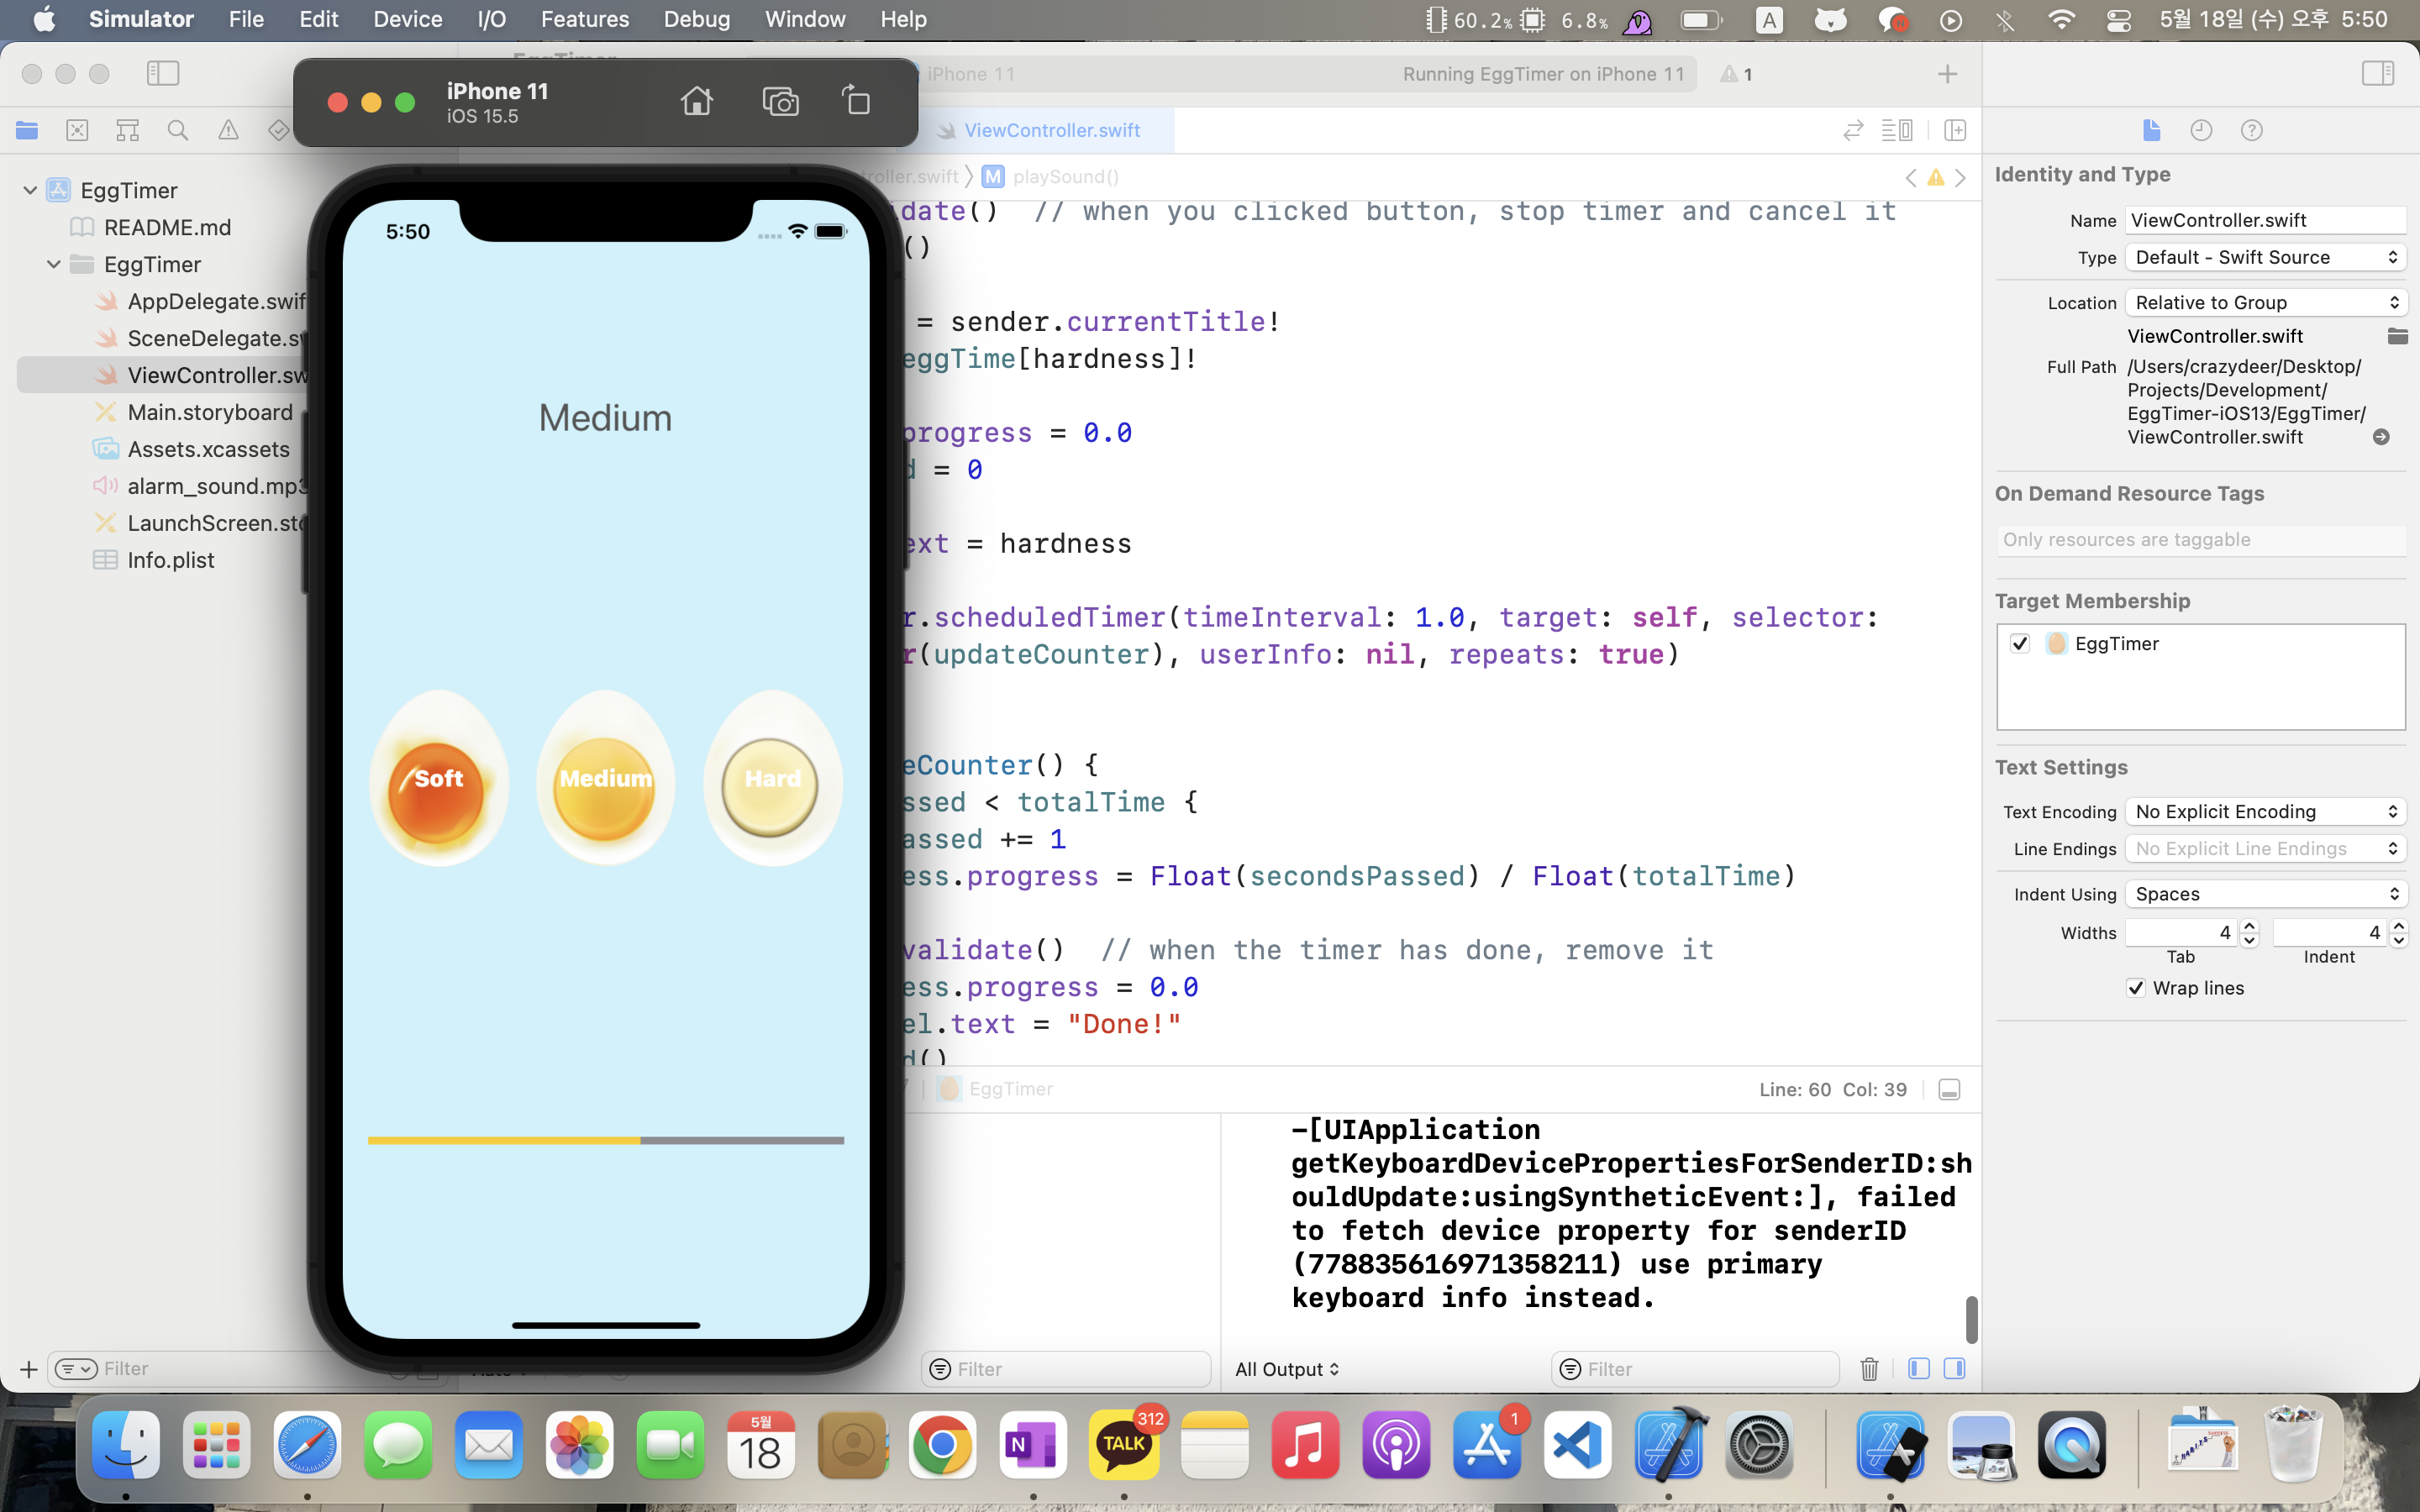
결과 이미지
참고
스택오버플로우: https://stackoverflow.com/questions/32036146/how-to-play-a-sound-using-swift
How to play a sound using Swift?
I would like to play a sound using Swift. My code worked in Swift 1.0 but now it doesn't work anymore in Swift 2 or newer. override func viewDidLoad() { super.viewDidLoad() let url:NSURL =
stackoverflow.com
'iOS' 카테고리의 다른 글
| iOS(Swift) Design Pattern: MVC (Model View Controller) 1편 (0) | 2022.05.21 |
|---|---|
| iOS(Swift) 구조체(struct) 사용 방법 (0) | 2022.05.20 |
| iOS(Swift) Timer Code (타이머 코드 개요, 이슈, 해결, 추가) (0) | 2022.05.18 |
| iOS (Swift) Optional 이란 무엇인가? (0) | 2022.05.17 |
| iOS(Swift) var와 let의 차이, 쓰는 이유 (0) | 2022.05.08 |


